
Every day, Android users capture over 235 million photos around the world.
I just made that statistic up, but it’s probably not too far off the real total.
Anyway – do you want to take better pictures using your Android phone? Of course you do. Here are some of the best ways to improve your smartphone photo-snapping skills:
Shoot multiple photos
Back in the day, each photo was a valuable item. Camera rolls only had a certain number of frames and there was a certain overhead cost to every picture. You had to pay to get each photo developed.
Digital cameras have changed that, but people are still stuck in their ways.
Next time you take a picture with your smartphone, tap the capture button 5 or 6 times – especially if you’re taking a picture of a moving object or changing scenery.
Don’t be afraid to take multiple shots. That way, you have a far better chance of taking a picture you actually like.
If space is an issue, then just delete the bad pictures. This may seem basic, but it’s a rule that surprisingly few people seem to follow.
I recommend avoiding deleting pictures until you check them out on a larger screen – photos that look awesome on a smartphone camera may look blurry or unfocussed on a larger screen.
Never shoot a darkened subject
There are some cases where you’d want to shoot a dark subject – if you’re trying to illustrate shadows or darkness or something.
But in most cases, you’ll want to light your subject using some type of light source.

Sometimes, that light source can be the flash or your camera. In other cases, you can turn a group of people so that light from the sun is hitting their faces.
Shooting a darkened subject isn’t the end of the world, but it can lead to grainy photos and poor results.
Try Google Camera
Google’s free Camera app is now available on the Play Store. The Camera app is excellent on Nexus devices. Today, the app is compatible with a wide range of Androids – including the Galaxy S lineup.

Cool Google Camera effects include lens blur – which emulates DSLR-style photographs – as well as PhotoSphere and panorama. Your camera might already have one or more of these photo effects, but the Google Camera is still an excellent replacement.
Some people download Google Camera purely for PhotoSphere, which lets you take a 360 degree photograph around yourself. It’s a killer feature.
Enable “anti-shake” mode and never take a blurry photo again
Most Android devices have a “stable” shot setting. Unfortunately, very few of these cameras enable that setting by default.
This setting is an excellent way to reduce blurriness in photos and make sure every picture you take is as crisp and clear as possible.
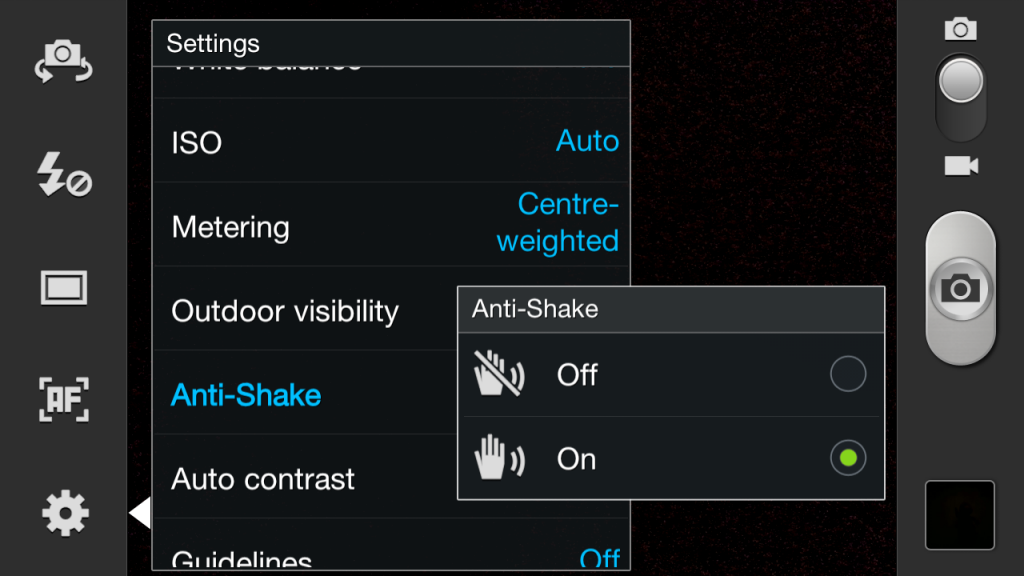
Here’s how stable shot works: after you press the “capture” button, your camera measures your phone’s accelerometer. If that accelerometer is too shaky, then the camera won’t capture the image until it stabilizes.
Unless you have super shaky hands, this process won’t delay a photograph by more than a fraction of a second – and it’s a great way to combat the dreaded blurred photograph.
Clean your lens
This is another tip that’s ridiculously simple but also commonly ignored: without a clean lens, your photographs are going to look awful.
Take a microfiber cloth and gently clean your lens with screen cleaner/eyeglass cleaner solution. A small speck of dust on the lens can mess up your auto-focus.

Or, a small film of dust left by a drop of water could give all your photos a grainy, washed out appearance.
Dirty lenses are rarely obvious. Take a few seconds to wipe your lens and see if you can notice a difference.
Do you have any more Android camera-shooting tips to add to the list? Let us know in the comments section and we’ll add them to the list!